Showing posts with label crafting. Show all posts

Saturday, September 17, 2011

dyeing (and playing) with acorns


After making my acorn flour from yesterday's post I was left with a bowlful of acorn shells.  I've seen them discolor water before so I thought I'd see if I could leach enough color out of them to dye wool, rather than just toss them back into the woods.

I put them all in the dyepot with some water and let them steep for a full day.  There was definitely color in the water but I decided to warm them up on a low burner for about an hour to coax more of it out.  Eventually the dye water turned to the color of coffee and I figured it was good to go.  I drained out the acorn shells and plunked my alum-mordanted wool in the warm dye and let it sit for several more hours.  The result was a pale tan, not unlike the color of the nut meat.


I wanted to make a little wool acorn out of this color so I wet-felted a bead and glued it into a cap and you know, it looked just like a little head with a fringe of hair sticking out from under its cap.  I figured I was due for some play time so I went in search of a body and wings and came up with this odd fella.


I'm not sure if he's a bug or a fairy or what.  I'll let my kids decide.  I've left him by the big oak, the one with the fairy pond in the middle, for them to discover.


Since I still had several gazillion acorns in the yard I also decided to play with one of the whole acorns and came up with this bitty ornament, complete with tiny wool mushroom.


It's good to play now and again, isn't it?
I hope you get some play time too.
Have a great weekend.

Thursday, January 13, 2011

Shared Creativity


I spent a little time yesterday working on a project for me.  The baby girl was down for a nap (insert angel-singing noises here) so the intrepid 4 year old and I shared the table for a little creative time.

I am working on making wool stones out of wool sweater and roving.  I need several hundred stones for what I plan to do so it should put at least a small dent in my wool stash.  It should also take me quite a long time.  My goal is to finish it before the end of the year.


A was refining his family portraits in orange.  The large orange blob is a potato on our heads, in case you're wondering.  I thought for a moment that daddy had a really awesome hairdo, but nope, potato.


Here's wishing you some good creative time this week too.

Saturday, December 04, 2010

Tiny Birch Bark Canoe Tutorial


If you find this, or one of my other tutorials, helpful and would like to make a monetary contribution to help me keep wool in my basket and ideas flowing, I'd be so grateful.  By clicking the "Buy Now" button below you can choose your own price for the tutorial.  It's completely optional, but oh so appreciated.

*************************

As promised, a birch bark tutorial! 
Since so many people seemed to love these tiny birch bark canoes, I thought I'd share how I make them.


What you'll need:

birch bark (bark, not birch paper)
raffia or waxed thread/artificial sinew
a sturdy needle
scissors
small twigs
clothespins or small binder clips

I've found it really helpful to soak the birch bark for several hours or overnight before doing this project.  It makes the bark more pliable and seems to keep it from tearing quite so easily.  If your bark starts to dry out while you're sewing you can dunk it in a bowl of water or steam it with your steam iron (which is also a nice way to convince pieces of bark to lie flat since the bark wants to curl up.  Perfect for making gift tags.).


Cut a rectangle of bark to the length and twice the height of the boat you want to make.  The piece I've cut is about 2 1/2" x 2".  Gently fold it in half but don't try to crease it.  I lay my finger along the center and use even pressure when I fold.


Cut the top curve of the canoe while holding the top edges together, making sure to get a symmetrical cut.


Clip a clothespin on one end of your canoe to hold it in place while you cut the curves at the other end of the canoe, again making sure the two sides match up evenly.  Repeat for the other side.


You now have your canoe shape and can begin to sew.  Use the clothespins or binder clips to hold the ends together while you work or to hold the piece together if you have to leave the project for a minute.


Thread your raffia or waxed thread onto your needle and prepare to sew.  You'll be sewing the entire canoe with one length of thread so make sure  you snip a long enough piece.  I cut about 20" for this tiny canoe.

note: if you have a dremel tool with a very tiny drill bit you can pre-drill your holes.  This makes the job much easier and the bark is less likely to tear while sewing.  If you don't have one it's OK, just sew carefully and keep a distance between your stitch holes and the edge of the bark.

Begin stitching at the bottom of one end, sewing through both layers of bark.  Sew up the curve and over the top of the "point" using a whipstitch.


Hold a twig flush to the side of the canoe and whipstitch around it and the top edge of the canoe side. 


When you reach the "point" on the other end of the canoe, stitch through both layers of bark, down then back up the second curved end, making an "x" or shoelace pattern.


When you reach the top of the curve your needle should be on the unfinished side of the canoe.  Sew a twig to this side as you had done on the other side.


Sew the "x" pattern down the end curve, and tie a small knot at the end.  Trim any excess twig and you have a canoe!


I choose to add some decorative stitches under the twig supports, but you can leave it as is if you'd like.  You can add a loop to use as a hanging ornament also.

You can also simplify the process by just sewing each end and skip the twig supports.  This style is more prone to tearing so handle these with care.


I made one of these canoes out of a cereal box for the boys to play with and the cardboard is a great weight to practice with.  I think these would also be really sweet made out of felt.

This is a decorative canoe and won't float as is.  By sealing the holes and weighting it properly though, it could be.

If you give this a try, I'd love to know how it turns out.
Happy sailing!

My PSA:  I think it should be noted that I gather my birch bark from trees that fall in our woods.  You can read about that process here.  Although I've read that you can harvest birch safely from a live tree, it seems unnecessary and destructive to me.  That's not my kind of thing.  Birches are plentiful where I live, but if they're not plentiful in yours, I'd bet you can find some suppliers of sustainable bark online.

Tuesday, June 30, 2009

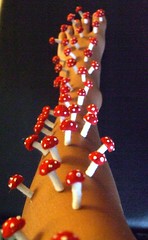
A Dream Come True


A dream come true!!
Originally uploaded by woolly fabulous

My friend Odile aka WoollyFabulous, turned one of her wacky dreams into reality by gluing tons of little red and white spotted mushrooms to her daughter's leg. What a crazy dream! What a creative woman! What a patient daughter! I'm loving it.


Saturday, November 01, 2008

Gearing up

Now that Halloween has passed, I feel myself gearing up for the Christmas season. I realized when I listed these new acorns in my shop this morning that my mind is already in frantic get-everything-done-before-Christmas mode.

Felted wool acorns - set of 3 - holly

I have a number of handmade gifts to complete this year. OK, well, start and then complete. On my list this year are new blankets for each of the boys, a couple of thumb pianos that I started last year but never completed, more felted worms, and super hero capes. I hope I'm able to summon up the energy to get all of these things done! For the time being I'll need to stop accepting new custom orders in my shop and focus on these projects and the custom orders I've already accepted. So if any of you out there know how to squeeze a couple extra hours into the day, I'm all ears.

Saturday, August 23, 2008

A challenge


I've decided to give myself a one-week crafting challenge. I will make 6 wool hearts every day for the next week and on next Sunday will post pictures of what I've completed. Why? Well, life has become a little hectic in my neck of the woods. What with kiddies and obligations and preparing for winter, there leaves little time to sit and relax. Since sewing is one of my favorite things to do to relax, I've vowed to myself to make more time for it. Whether or not I get my completed works listed in my Etsy shop is another matter. I'm hoping though to feel a little sense of accomplishment, get a chance to kick my feet up, and enjoy a little quiet creation time. Want to join me?

Friday, August 08, 2008

From start to finish


It seems lately that I haven't been able to finish much of anything. We've hit a busy spell in our lives and many things we love have hit the back burner. Our yard is unkempt, our veggie garden needs weeding, the house is all a-clutter, and my crafting has stagnated. A frustrating thing to be sure, as I am normally quite a prolific thing-maker. Projects that I would normally whip through in a day are taking me weeks to complete and I'm feeling out of sorts. I guess that's why today I let out a big sigh of relief when I *finally* completed a project.


I've been working on an order of felted wool brooches in the shape of apples and oranges and today I finished the last one. I nearly did a cartwheel but not being sure if I could still do cartwheels, I settled for a squeal instead.


What had started out as discarded wool sweaters has been transformed through felting, dyeing, and sewing into (if I dare say so myself) cute little oranges and apples. I found a few shipping tags in the studio on which to display the pins and added a bit of recycled paper and vintage seam binding, just to finish it off. I'm pretty happy with them and I hope the dear customer will be as well.


My to-do list is still ridiculously long, but I feel bolstered by this one small feat and am setting off to accomplish more. Wish me luck.

Wednesday, July 23, 2008

Back in the saddle


Oh my, it's been quite a while since I've written. The last few months have been spectacularly busy. Between crafting, kiddies, and life, I've been up to my gills. I'll do my best to pop in here more frequently, if only for a quick photo post or observation.


I am so excited to have been chosen to participate in a special exhibit at The Bakken Museum in Minneapolis, dedicated to recycled crafts. The exhibit is tomorrow, July 24th. Sadly I won't be able to make the drive down, but just knowing that my work is in any kind of museum is enough to make me giggle. The Bakken is supposed to be fun and interactive for the kids so if you're in the area, stop on in!


This leather bouquet is something I created for the exhibit. It's made of reclaimed leather from purses, coats, and clothing pieces with vintage button centers.


I also sent some recycled felted wool items made from felted sweaters including some bird pins, a mushroom, a wallet, and some heart ornaments. I haven't had much time to sew lately and it felt really good to take a few hours for the quiet retreat.
Speaking of recycled wool items, please do check out my friend, Woolly Fabulous' work on Etsy, you'll marvel at her feltwork. She uses felted wool sweaters and creates the most detailed, amazing pieces. You'll love it.

LinkWithin

Related Posts with Thumbnails